The photography guide to
 Grand Canyon Rafting Tour
Grand Canyon Rafting Tour photography guide
Our contributors have added 15 photo spots to this Grand Canyon Rafting Tour photo guide. Have you discovered an amazing new location in Grand Canyon Rafting Tour?
Introduction
Rafting through the Grand Canyon should be on the bucket list for every landscape or adventure photographer. It is a one-of-a-kind trip that is filled with scenic beauty and photographic potential, covering up to 277 miles on the Colorado River. Trip lengths can vary, but usually last from about 5 days to 2 weeks. Nights are spent camping on river beaches, and days are spent on the river or enjoying hiking side canyons, swimming, or just taking in the amazing scenery.
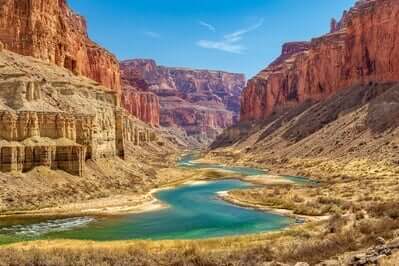
Raft trips follow the Colorado River as it winds through Grand Canyon National Park, one of the crown jewels of the United States National Park System and a UNESCO World Heritage Site. A full 277-mile raft trip actually starts in Marble Canyon. Marble Canyon is not as deep or wide as the Grand Canyon, but is incredible beautiful in its own right. Marble Canyon ends, and the Grand Canyon begins, at about river mile 62 at the confluence of the Little Colorado River with the Colorado main stem. Both Marble and Grand Canyons were carved by the Colorado River over millions of years as the land around the river was tectonically uplifted. The Grand Canyon is up to 18 miles (29 kilometers) wide and over a mile (1.6 kilometers) at its deepest. The oldest rocks exposed in the canyon date back nearly two billion years.
The colorful rocks that form the canyon walls, and their interaction with the river, offer a myriad of photographic opportunities. The trip can also offer good plant and wildlife photography (the canyon is home to about 1,500 types of plants, over 350 types of birds and nearly 90 different mammal species), action/adventure photography (shots of rafts running the rapids), and cultural photography (there are numerous ancient ruins and petroglyphs).
Most popular Grand Canyon Rafting Tour photo spots


Travel
All raft trips start at Lee's Ferry (except for some commercial day trips that start at Diamond Creek and only see the very end of the canyon), but can have varying lengths. Some people chose to hike in or out at Phantom Ranch via the Bright Angel Trail. Some of the best photography, in the author’s opinion, is upstream from Phantom Ranch, so try to start your trip from Lee's Ferry. The various take outs include Whitmore Wash (river mile 188), Diamond Creek (river mile 226), and Pearce Ferry (river mile 280). Most commercial trips take out at Whitmore or Diamond Creek. There is an additional take out below Pearce Ferry, but it is no longer recommended due to the new Pearce Ferry Rapid, which recently formed when the river cut through old Lake Mead lake bottom sediments (the water level in Lake Mead has dropped considerably in the past several decades, exposing the old lake bottom) and is considered not runnable.
To start your trip, you will need to get to Lee’s Ferry. It is easily accessible by car, though you will need to arrange for a car shuttle to bring your car to your takeout point. There are commercial concessionaires that provide this service but be sure to book ahead of time. You can also fly into Lee’s Ferry via a small plane. Service is available for Las Vegas, Nevada, which also the location of the nearest major airport.
Grand Canyon Photography Highlights
As previously mentioned, below the Little Colorado River, the Grand Canyon begins. The look of the canyon from the river is very different depending on what rocks the river is cutting through, making the photographic experience quite different in differing parts of the canyon, and the main difference between Marble Canyon and the Grand Canyon, at least as viewed from a raft on the Colorado River, is controlled by geology. Below the Little Colorado River, the Colorado River cuts through the bottom of the Paleozoic rocks that from Marble Canyon, across the Great Unconformity, and into much older, and softer, sedimentary rock. With this change, the canyon widens significantly from the generally narrow canyon with steep walls in Marble Canyon. Further downstream in the Grand Canyon, the pre-Paleozoic sedimentary rocks are replaced by truly ancient metamorphic rocks and granite. These very old rocks are hard, and the canyon narrows again.
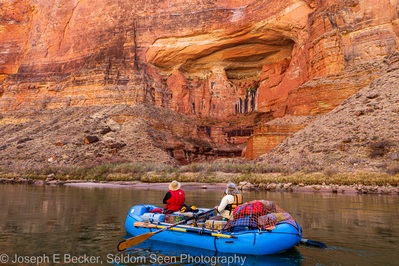
The lowest Paleozoic rock formation is the Tapeats Sandstone. Just downstream from the Little Colorado, groundwater seeping through the Tapeats has left salt deposits near river level on the Tapeats. These salt deposits, known as the Hopi Salt Mines, are sacred to the Hopi people, would still make occasionally make journeys from the canyon rim to harvest salt. The Hopi Salt Mines are off limits and rafts cannot stop in this section of the river. To take a good photo of the salt deposits, shoot with a telephoto lens from your raft, trying to keep your entire composition in the shade to prevent too much contrast when the white salt is in direct sunlight.
Below the salt mines, the canyon opens as geology changes as described above. There are no significant rapids here, or any must see sights, just broad canyon views, sometime up to the rim, as you float downriver. Both at Tanner (mile 68.5) and Cardenas (mile 71) Creeks there are short hikes to ruins of ancient pueblo watchtowers that overlook bends in the river. The second of these overlooks the Unkar Delta, which contains many ruins (though they are not very photogenic).
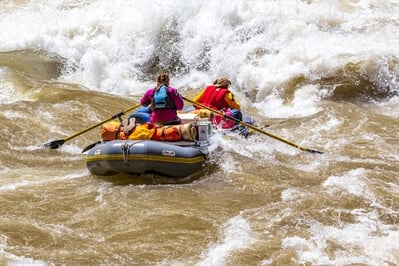
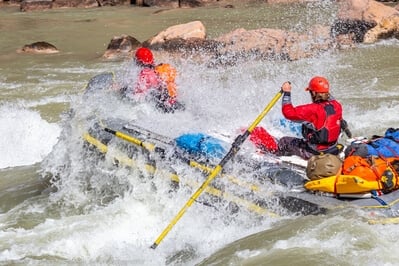
The rapids start to pick up below the Unkar Delta. From mile 73 to 85, there are a series of rapids, including five big ones: Unkar (rated 6 – 7), Nevills (6), Hance (8-10), Sockdolager (8-9), and Grapevine (8). Hance Rapids, in particular, is big, dropping 30 feet in half a mile. Considered by many as one of the top three rapids in the canyon, many trips will stop and scout the rapid. The primary scouting point is high above the river on river right. From this spot, you will need a telephoto lens to shoot rafters braving the rapids, but the view of the river and rapids from the scouting point is quite scenic even without rafts and can be shot with a wide-angle or normal lens.
Shortly after your “dance through Hance”, the river enters the Upper Granite Gorge, where the river has cut down into the Vishnu Schist and Zoroaster Granite. These 1.7-billion-year-old rocks are the oldest in the canyon. The black schist and red granite make this section of the canyon very scenic, but these rocks are also very hard, so the canyon (at least at river level) narrows forcing the water to speed up and the rapids to become generally bigger. This section includes Sockdolager and Grapevine Rapids.
Below Grapevine, you will come to the Kaibab Suspension Bridge, also known as the Black Bridge, and Phantom Ranch at river mile 88. Most trips stop at Phantom Ranch where you can mail a postcard and buy an ice cream cone. Many trips transfer passengers here, with some leaving and hiking out to the South Rim, and others hiking down to join the trip downriver. Camps near Phantom of reserved for trips doing passenger transfers.
As you leave Phantom, you pass under the Bright Angel Suspension Bridge, known as the Silver Bridge. The river continues through the Upper Granite Gorge, running narrow and fast. Anyone joining the trip at Phantom won’t have much time to relax, as there are several big rapids between miles 90 and 98.5, including Horn Creek (8-10), Granite (9), Hermit (8-9), and Crystal (8-10). The primary scouting spot for Horn Creek Rapid is similar to Hance, fairly high on the hillside, providing a nice view of the canyon and rapid, but not good for photographing whitewater action without a telephoto lens.
Both Hermit Rapid and Crystal Rapid provide good opportunities for photographing rafts braving the rapids close up. The scouting locations are very close to the large waves and holes in the river, and you can get decent photographs of rafts shooting the rapids with a short to medium telephoto lens, or even a normal lens. Guides may not necessarily want to scout Hermit, so you may want to ask to stop and photograph the other boats in your group going through. On the other hand, Crystal, is scouted by most trips, and you can easily position yourself by the monstrous hole that makes Crystal famous.
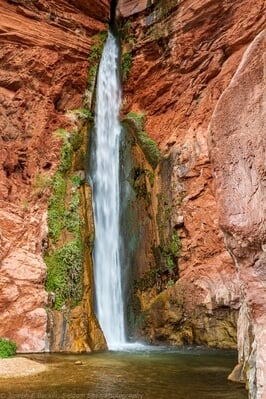
Crystal is the last big rapid for a while, though there are many smaller rapids in the canyon below Crystal. At river mile 109, there is a short hike to Shinumo Creek Falls. These falls are reportedly not very photogenic (the author has never stopped there). However, the next waterfall is very scenic. At mile 116.5, there is a short trail/scramble into Elves Chasm with its small waterfall. You’ll need a wide-angle lens to get the best composition. Every river trip seems to stop here, so you may not be alone, patience is the key to getting your shot.
At approximately river mile 117, the river exits the upper gorge and enters the Stephen and Conquistador Aisles, where the Tapeats Sandstone again lines the banks of the river. At mile 120.5 is Blacktail Canyon, a lovely slot canyon through the Tapeats Sandstone with a small waterfall. Just past Blacktail is the Conquistador Aisle, the longest straight stretch (3 miles) in the Grand Canyon. By river mile 123, the river cuts into the older schist and granite and enters the Middle Granite Gorge. This gorge is much shorter than the upper (or lower) ones, ending at about mile 131. Within the gorge is Bedrock Rapid (8), the only rapid in the canyon formed directly on the bedrock of the river bottom.
Leaving the Middle Gorge is the Deubendorff Rapid (7-9) and, just below the rapid, Stone Creek at mile 132. A short hike up the creek from the beach on river right leads to a pretty waterfall that is definitely worth shooting if your group stops here. At river mile 133 is Tapeats Creek. From here, its a great hike along the creek up to Thunder River – a large spring that gushes straight out of a cliff face creating a large waterfall. The hike is about 3 miles from the river.
Below Tapeats Creek at river miles 134 to 135 is the Granite Narrows. Here, again, the river cuts into the harder older rocks, forming a short stretch of narrows, at one spot only being about 100 feet across. As you come out of the narrows, Deer Creek enters on river right. Deer Creek Falls plunges 180 feet to river level, just a short distance off the river. Above the falls, the creek cuts through a slot canyon to an incredibly beautiful place called The Patio.
The entire falls is not visible from below (or above), and a wide-angle lens is required to place the visible portion of the falls in your frame. Deer Creek Falls (and the narrows above the falls) are one of the most popular stops on Grand Canyon rafting trips, so there is a good chance you will not be alone when photographing the falls. Additionally, during warm weather, the pool at the base of the falls is a popular swimming hole and, also, many people like to stand directly beneath the falls. Therefore, you may need to incorporate people into your composition or take multiple shots and use selective editing to create a composite without people.
There is a rafting campsite on the opposite of the river a short distance downstream. If camping there, you can get an excellent shot of the falls with the river in the foreground by hiking back upstream to a spot directly across from the falls.
Above the falls is Deer Creek Narrows, a deep, narrow canyon where the creek curves through brownish-red striated sandstone, creating a stunning slot. You will need to climb the short, steep trail south of the falls to access the narrows and The Patio. As the trail comes out at the top of the narrows, there is a great view up canyon of the river. The trail through the narrows winds along the western canyon wall above the slot canyon. There are several spots along this section of the trail with good views down into the gorge. When shooting here, take care along the edge of the cliff. Along the non-gorge side of the trail through the narrows there are several spots with hand-print pictographs. Some are rather faint, and in general, the pictographs are easier to spot when walking toward the river.
The narrows opens up in the Patio area, where are lots of compositions of small waterfalls, the creek, rocks, and cottonwood trees and other vegetation using wide-angle to short telephoto lens. Because of potential contrast issues, Deer Creek Narrows and the Patio are probably best photographed on cloudy days or when completely in shade. This may require using higher ISOs to limit shutter speeds.
The next major “must-see” site after Deer Creek is Matkatamiba Canyon at river mile 148. Matkatamiba, also known as Matkat, is a gorgeous and photogenic narrow limestone canyon on river left. The entrance to the canyon is narrow, so that not all trips stop here, and is also easily missed. The canyon presents a twisting layered limestone narrows section close to the river that requires some chimney climbing, so leave large camera bag in the boat. The canyon can be dark, and you’ll probably not have your tripod, so crank up the ISO.
Matkat is followed, at river mile 156 by Havasu Canyon, also on river left. Havasu is a day-tripping site for nearly every raft trip because of its beautiful blue-green waters, travertine ledges, cascades, and stunning waterfalls. The hike up the canyon to the lowest of the waterfalls, Beaver Falls, is about 3 miles and Mooney Falls another 5 miles or so. It’s a significant round trip hike, and most rafters stop at or below Beaver Falls. Even without visiting the waterfalls, the creek and canyon is one of the most beautiful spots in the Grand Canyon, if not the world.
The land on the left bank of the river from mile 164.5 through 273.5 is part of the Hualapai Indian Reservation. The first photo worthy stop on the reservation is National Canyon, where there is a nice short hike with limestone narrows and pools of water at National Canyon at river mile 166.
At river mile 178 is Vulcan’s Anvil, a black volcanic plug sticking out of the middle of the river. Though not super photogenic, you may want to get a shot as a reminder of what lies ahead – Lava Falls.
Lava Falls, the most formidable rapid in the canyon, occurs at mile 179. You know you are close after you pass Vulcan’s Anvil and you can hear the roar of white water but you can’t see any, with the river disappearing below a “horizon line” line ahead. That horizon line represents the top of the rapid, which drops 37 vertical feet over several hundred horizontal feet. It is reported by the Guinness Book of World Records as the fastest navigable water in all of North America. Rated as class 10 (on a scale of 1 to 10), it is a wild ride that can flip even the most experienced rafter.
The rapid is usually scouted on the right, where trails lead to a perch overlooking the top of the rapid. From the scouting position, you may wonder how any raft can make it through without flipping. And many do (do a Google search for “youtube lava falls flip”). With luck, you can shoot the action as another group or a portion of your group attempts the rapid. You’ll probably want a telephoto zoom to shoot rafts taking on Lava Falls, the top of the rapid is fairly close to the viewpoint, while the bottom is distant. You may also want to shoot with shutter priority with a shutter speed of 1/250th or faster, possibly with a partial to full positive stop of exposure compensation to account for the white water, or shoot on manual mode. When it’s your turn to run the rapid, seal the camera in its waterproof container, strap it in well, and hang on!
Many trips stop at a river-right beach, known as Tequila Beach, below the rapid to celebrate a successful run. Pull the camera back out and shoot the celebration (while also taking a few tequila shots yourself).
About eight river miles below Lava Falls is Whitmore Canyon. Many end their Grand Canyon trip at Whitmore, where there is a trail up to the rim, and a helipad used by some commercial trips for flying their clients out. Yet, if you can, keep going past Whitmore, there are still about 90 miles of Grand Canyon left. You won’t have any more huge rapids (but plenty of smaller ones), and final 37 miles of so is on the slow currents of upper Lake Mead, but the scenery is still great.
At river mile 199 you’ll pass Pumpkin Spring on river left. The spring has built up a wall of colorful orange travertine above the river. At the top, inside, you will find the milky green water of the spring, which contrasts nicely with the orange rock. The green water is not visible from the river, so you’ll have to stop to photograph it.
The river enters Lower Granite Gorge around mile 216. The gorge is formed by black schist interlaced with red granite, and you can capture some abstract-looking shots as you float by. Eventually the gorge opens up with views of the scenic and distinctly shaped Diamond Peak. At mile 226 is the Diamond Creek takeout. Most commercial trips that didn’t takeout at Whitmore take out here. Many private trips do as well. It is also the launch site for day trips through the lowermost canyon, so river traffic may actually increase below Diamond Creek.
The next landmark is Travertine Falls at river mile 229. It forms an impressive and colorful wall of travertine. It is worth a stop to shoot. At mile 240 is Separation Canyon, where several members of Major Powell’s first trip through the canyon left the river (and were never heard from again) rather than go through the biggest rapid of the canyon, Separation Rapid (now drowned under the water of Lake Mead). There is a memorial marker on the rocks above the river on the southern side of Separation Canyon.
The flat, no-current waters Lake Mead formerly extended up to Separation Canyon, but with the decades-long drought in the American Southwest, that is no longer the case. The river continues with current all the way to Pearce Ferry, but the rapids are gone, buried by sediments deposited when the lake was higher. For this final stretch of the canyon, motors are allowed year-round, and many trips tie their rafts together and strap on an outboard motor to help speed down to the takeout.
While the canyon is still impressive in this final 37 miles, the sediments left by Lake Mead when it was bigger mar the canyon along the river. These sediments make steep banks and cliffs (growing every taller as you travel downstream) along the river which occasionally “calve off” into the water as the river continues its erosional work. There is one last photographic stop, the pretty Columbine Falls at about river mile 274.5. It is located via a short hike on river left. Though impressive, the falls are now about half their former height, reduced by sedimentation from Lake Mead.
At mile 277 is Pearce Ferry, the final practical takeout (there is another takeout further downstream, but shortly past Pearce Ferry is the newly formed and very nasty Pearce Ferry Rapid, created when the river cut a new channel, rather than resuming its old channel, through the lakebed sediments and encountered bedrock). Pearce Ferry is a rather hot and dreary spot, and while you may want to document the end of your trip as the boats de-rig, the location itself is not much to look at.

Responsible Photography
Grand Canyon is a special place that deserves respect and protection from all who visit. The desert environment of the canyon, when coupled with a high visitation rate to the relatively small footprint of the river corridor, can easily be permanently adversely impaired unless everyone follows a leave-no-trace philosophy. As a photographer, it is important to be mindful of your impact on the landscape and ecology and to be careful not to destroy the very reason you are there.
Being in a national park, all the normal park rules apply: no picking flowers or destroying vegetation; no collecting rocks, other natural objects, or historical objects; no drones; respect park rules; etc. However, there are special considerations for the Grand Canyon. While off-trail travel is allowed in most spots, take care not to step on cryptobiotic soils, which are very fragile and take decades to form. All trash, including biodegradable trash such as apple cores, etc. It also includes human waste, which must be collected, transported, and disposed outside the canyon (liquid human waste can go in the river – but be sure to pee in the water or on wet sand, not on dry land). You are encouraged to even pick up micro-trash (for example, an oat grain fallen off or a granola bar or a spec of lettuce from a sandwich).
Cultural artifacts abound in the canyon, including not only petroglyphs and ruins but also carvings and artifacts from early explorers. These are to be left in place and undisturbed. Do not touch, let alone climb into, ancient ruins. If you find an artifact, such as an ancient clay pot, leave it alone and do not share its location with anyone else other than the National Park Service.
Marble Canyon Photography Highlights
Unless you hike in at Phantom Ranch, your raft trip through the Grand Canyon will start at Lee’s Ferry. At Lee’s Ferry, the Colorado River runs green and cold, as the water is freshly released from Glen Canyon Dam several miles upstream. The color often seems impossibly green, especially when shooting with a polarizing filter. Just south of Lee’s Ferry, the Paria River flows into the Colorado River, typically adding brown silty water to the Colorado; however, not enough to change to green color. Shortly thereafter, the walls of Marble Canyon rise up around the river.
Marble Canyon, though not nearly as deep as the Grand Canyon, is wonderful to photograph. The sedimentary rocks that form the canyon walls, often make spectacular, colorful cliffs which plunge straight down into the river – particularly the Redwall Limestone. The resultant photographic experience is quite different than in the Grand Canyon proper, which cuts through older granitic and metamorphic rocks, leaving the sedimentary formations high up on the sides of the canyon, often not visible from the river.
As you leave Lee’s Ferry and the Paria River behind, Marble Canyon gradually deepens as the river winds south and west, cutting downward through the Paleozoic sedimentary rocks that are found at the top of the Grand Canyon proper. Several miles south of Lee’s Ferry, the canyon is already several hundred feet deep, with sheer vertical cliff walls. Here is the Navajo Bridges (the original highway bridge and the neighboring foot bridge added much later). It’s fun to shoot from on the bridges looking down to the river the day before your trip begins then again looking up and shooting the at the bridges from the river on the first day of the trip. The spot is also popular with Californian condors. These huge birds are probably more easily photographed from the bridges than from your raft. You will likely see other condors on occasion throughout the length of Marble Canyon.
A couple miles downstream from the bridges you will encounter the first rapid of the trip at Badger Creek. While not a small rapid, Badger Creek Rapid, along with the other rapids in Marble Canyon, is rather tame compared to the big drops in the Grand Canyon proper. Depending on flow levels and the experience of you boatmen/guides, your trip may not stop to scout any rapids within Marble Canyon, so most of your photography in Marble Canyon will be of scenery rather than whitewater action unless you bring a waterproof camera. That said, rafts can flip in almost any rapid. On the author’s most recent trip, the raft he was on flipped and two other boats “dump-trucked” their passengers and boatmen in Mile 24 Rapid.
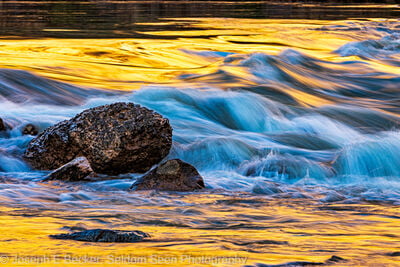
While you may not shoot much white-water action in Marble Canyon, you can create some wonderful shots of rapids should your trip camp next to any (and most campsites both in Marble and Grand Canyons are adjacent to rapids). By camping near rapids, you can shoot the canyon with the rapids in the foreground during the golden hours, using long exposures to make the white water smooth and silky.
Much of the scenery in the Grand Canyon occurs in side canyons to the Colorado. Many trips stop to hike in several of these side canyons. Cathedral Wash, located at river mile 3, upstream of the Navajo Bridges, is quite pretty and can be hiked either up from the river or down from the road into Lee’s Ferry. The next canyon downstream worthy of a photographic stop is North Canyon, at about river mile 20.5. And near river mile 29 is the Silver Grotto, a small and colorful amphitheater near the river in Shinumo Wash.
About 30 river miles are so below Lee’s Ferry is Vasey’s Paradise, a gushing spring shooting from the red rock above the river, with ferns and other green growth covering the slopes below the spring. This is often mentioned as a good photographic location. However, on the author’s most recent visit, the spring was trickling rather than gushing, and much of the vegetation was brown and dead. The decades long drought on the Colorado Plateau has contributed to the decrease in spring flow such that now it is a shadow of its former self. If you do stop here, beware of poison ivy.
But drought cannot harm another highlight of Marble Canyon: Redwall Cavern. Not really a cave, Redwall Cavern is a huge, deep alcove at river level carved out of the Redwall Limestone. In his exploration of the canyon, Major John Wesley Powell described Redwall Cavern as being able to hold 50,000 people. That might be an exaggeration, but it could easily fit several thousand. The floor of the cavern is deep, soft sand. Reflected light off the canyon wall lights the inside of the alcove with a warm red glow. To get the entire mouth of the cavern in a single shot requires an ultra-wide-angle lens. Alternatively, you can stitch several images together to form a panorama covering the entire cavern. To have detail both inside and outside the cavern, consider using HDR. Also consider shooting silhouette shots of people to give a sense of scale. Good shots can be made most anytime of day, but are probably best in the morning when the sun lights up the opposing canyon wall.
Past Redwall Cavern, there is a natural bridge, the Bridge of Sighs, on river right at about river mile 36. It’s not most photogenic arch you’ll ever see, but if you want to catch a shot of it, be prepared as it is only visible along a short section of river and you’ll likely be shooting from the boat rather than stopping.
Near river mile 41.5, you will pass the very scenic Royal Arches. These large alcoves are easily photographed from your raft as you float by. At mile 43.3, you can see the remains of Anasazi Bridge, a wooden structure built by the Ancestral Puebloan people to connect two cliff ledges, high above the river on the right. It is quite distance from the river, and without a long telephoto lens, difficult to shoot. At river mile 47, you will pass the Triple Alcoves, and like the Royal Arches, good shots can be made from your raft.
Shortly past the Triple Alcoves is Saddle Canyon. This side canyon is definitely worth exploring with your camera. A short hike (about 1.4 miles one-way) up the canyon leads to a slot canyon and scenic waterfall.
At river mile 53, you reach one of the highlights and most icon shots of the entire Grand Canyon, the Nankoweap Granaries. Almost every raft trip stops here and takes the short, but steep (about 0.6 miles and 600-foot elevation gain), hike up to the granaries. With the granaries in the foreground right and the canyon in the background left, it is truly a world-class spot. A moderately wide-angle lens works well, or you can stitch together a panorama, possibly using HDR to help with the contrast. Touching or otherwise disturbing ancient structures in Grand Canyon National Park is prohibited, so please be careful not to touch or lean against the granary walls. It would be a shame if the Park Service decided to fence off this area sometime in the future due to visitors interfering with the structures. Besides shooting compositions with the granaries, try shooting the canyon by itself, the view of which, even partway up the trail, is amazing.
There are no major sights through the rest of Marble Canyon until the Marble Canyon ends and the Grand Canyon begins at the Little Colorado River at river mile 61.5. The Little Colorado River is a major tributary of the Colorado River that flows year-round due to the discharge of Blue Spring at about 200 cubic feet per second. Blue Spring, which is located about 15 miles upstream on the Little Colorado from its the confluence with the Colorado River, is aptly named. The water emanating from the spring is a wonderful turquoise blue color and the color carries downstream all the way to the confluence. However, the blue waters can occasionally be overwhelmed by brown dirty water during extended rainy periods or flash flood events further upstream in the Little Colorado basin (the Little Colorado is typically dry upstream from Blue Spring). This more typically occurs in the “monsoon” season of late summer.
The high mineral content in the waters of the Little Colorado River also leads to incredibly white sand deposits along the riverbanks in the area near the confluence. The white sands, blue waters, red canyon walls, and dark green water of the Colorado River make the lower reach of the Little Colorado River an amazing spot to do photography.
Most commercial river trips stop at the Little Colorado River for several hours, and some private trips stop for longer periods which allow hiking up the canyon. The confluence of the Little Colorado River and the Colorado River is a sacred place for several Native peoples. It is also one of the last places the endangered humpback chub lives (a type of fish). Please respect the land and water in this area.
Logistics & Equipment
Before taking a raft trip through the canyon, you must first decide on what type of trip you will be taking. You can go on a commercial trip or on a private trip. Commercial trips are easier to book, are considerably more expensive, and may give you less time for photography (unless you are on a special photography-focused trip) than private trips. While easier to book than private trips, you will still likely need to sign up months, if not a full year, in advance to land a slot on a commercial trip.
The hardest part about rafting the Grand Canyon on a private trip, is getting the permit. Permits are handed out through an on-line lottery. Each year, in February, the Park Service holds a weighted lottery for permits for the following year (link provided below). The chances of getting a permit for any one person is very slim. To increase your chances, try putting a group together and having everyone apply for the same trip launch dates. Each permit is good for up to 16 people.
You should also consider what type of trip you want. Most private trips will be on small human-powered rafts (14 – 18 feet), while many commercial trips will be on large motorized rafts. Small oar boats are commonly used for private and some commercial trips. These typically have one to three passengers in addition to the boatman (not always a man, but always called a boatman) on the oars. These smaller rafts work great for photography because it's easier to take shots on the water without getting a piece of the raft in your composition and often the boatman will help out with your photography (positioning the raft, volunteering to go in a second group of rafts through a rapid so you can shoot the first group, etc.).
Once you book your trip, you will need to figure out how to keep your camera gear safe from sand and water. It is likely you will get wet, even on days without big rapids, so how do you keep your camera dry? The main two options are ammo cans or Pelican (or similar) cases. Some people may also use dry bags, but the author does not recommend these as they are difficult to seal properly, especially if you are in a hurry to seal your gear before an upcoming rapid. Pelican cases have the advantage over ammo cans of being easier to open and shut, having your gear better organized, and (depending on size) carrying more gear. However, while both ammo cans and Pelican cases can leak, many people trust an ammo can more than a Pelican case. On a trip made in 2021, the author’s raft flipped and all his gear spent about 20 minutes underwater. The ammo cans holding his camera and lenses were completely dry inside. His Pelican case, carrying spare batteries, books, and assorted other odds and ends, leaked, letting in several ounces of water.
However, there are those that prefer Pelican cases. And reportedly, on commercial trips you may not have full access to your ammo can when on the boat. What you use to carry your gear is an important consideration and you should talk with your trip leader or commercial outfitter about what will work best for your individual situation.
While ammo cans come in varying sizes, there are only one or two sizes that work well for quick access: the 50-caliber size and the “fat 50” size. A fat 50 ammo can typically fit a camera body with the 24-70mm lens, a wide-angle zoom lens, a spare battery, and some odds and ends. A 50mm can is smaller, so you probably won’t be able to fit the extra lens in it. The most typically larger size is the 40 mm can, in which you can fit several larger lenses, such as a 70-200mm lens and a 150-600mm lens. These larger ammo cans are typically strapped in on a raft so they are not accessible when on the boat, though you may get access to them during stops during the day. You may also want to take a day pack for hiking, but you won’t want to keep any camera gear in it as it will typically get wet each day. You can use smaller dry bags inside the backpack to hold extra clothes, running shoes (to use on hikes), etc. These bags could also be used to carry an extra lens when hiking.
Most photographers will be happy with two lenses: a 24-70mm and a 70-200mm or similar. A wide-angle zoom is occasionally useful, but not essential. A big telephotos, such as a 100-400mm or a 150-600mm can be used for shooting rafts going through rapids; however, depending on the storage setup on your raft, you many not have access to your big lens during the day. Also, many rapids can easily be shot with the 70-200mm lens.
When planning to shoot rafting action through the rapids, it helps to understand the rating system for rapids. In the Grand Canyon, rapids are rated on a scale of 1 to 10, with 10 being the most difficult. Ratings for a particular rapid can change depending on volume of river flow – typically, but not always, being rated higher at higher water levels. Running a rapid with a rating of 5 might be fun, but won’t provide much in the way of action shots. Those rated 8 – 10 typically provide plenty of action (and a bigger chance of getting your gear wet).
Whether using ammo cans or a Pelican case, you will want to make sure it is well strapped in on the raft. Your boatman should have straps you can use to strap you can or case to the frame of the raft. When accessing your camera when floating, try loosening the strap, but not totally removing it, and close the can/case after removing your camera. You never know when you might accidently bump your case and send it over the side.
In addition to your main camera, you might want to also carry a small waterproof camera for shooting when in the rapids, or get a waterproof case for your phone and use its camera.
Speaking of phones, many people use their phones as their main (and only) camera. However, there is the consideration of how to keep a phone’s battery charged. With a camera, you can take multiple batteries, but (depending on the length of your trip), you will still need to consider how to keep your camera batteries charged. Consider bringing several portable power packs and a USB battery charger.
You should also consider image backups. If you have a camera with two card slots, set it up for automatic backups to the second card. If not, you may want to bring a small portable hard drive for backups or risk going without.
Some people like to use Go-Pros on river trips, which they typically attached to the top of a helmet (while life jackets are required when on the river, helmets are optional and most people do not wear them). Other attach Go-Pros attached to vertical rods extending above the back of their rafts. If you take a Go-Pro, you should attach it with an extra strap just in case the primary connection breaks. You may also consider attaching a float. One of the people with a Go-Pro on the author’s recent trip was in a raft that flipped in Crystal Rapid. He swam most of the rapid, and when finally was rescued, he said "at least I got some good video" as he patted the top of his helmet to find the Go-Pro gone.
Tripods are a must for serious photography. However, on a raft trip, most of your gear is stowed during the day and not accessible. That includes tripods. It is highly suggested to bring a tripod, and you may be able to work out a deal with your boatman to keep it accessible during the day, but don't bet on it.
A Grand Canyon river rafting guidebook is also helpful to bring along to see what is coming up and help plan your daily adventures. It is probably more helpful to buy a waterproof paper copy of such a guide rather than getting an phone app.
Links
On-line river mile guide to the Grand Canyon
Phantom Ranch weather
Grand Canyon Geology
Grand Canyon wildlife
Explore more photo spots in United States
If you want to explore beyond Grand Canyon Rafting Tour, we have 1880 photo spots and 15 events that you can visit in United States.
Curated By

Joe Becker Curator
We hope you enjoy this guide to photographing Grand Canyon Rafting Tour - don't forget to share your images on PhotoHound and tag us on social media using hashtag #photohound