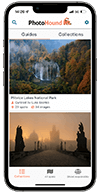
Add a spot
Anyone may add a new photo spot to PhotoHound. All spots are curated by the PhotoHound Team to ensure that they meet the following criteria:
All spots must
- Fit with the PhotoHound Code of Responsible Photography;
- Adhere to copyright regulations;
- Be accessible by the general public and not put photographers at unnecessary risk or at odds with regulatory guidelines;
- Be unique; they must not duplicate, or be very similar to any already added.
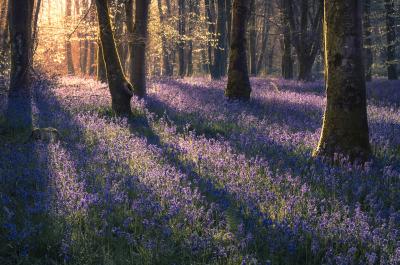
Durweston
England Chris Frost
Prime spots
Prime spots are spots that our curating team consider to be particularly inspirational, accurate and helpful to the PhotoHound community. You will receive a notification from us if your spot has been published as a prime spot. Prime spots must also meet these additional criteria:
Prime spots must:
- Be appealing to other visiting photographers;
- Show additional map markers such as public transport, car parking, trail starts and entrances;
- Be completed as fully as possible, including accurate and detailed descriptions, helpful local and technical information; full tagging of best times, ideal equipment and photography genres;
- Include more than one high quality, inspirational photographs that are representative of the location.
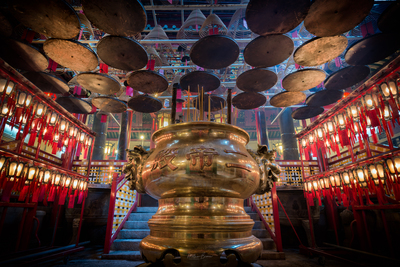
Man Mo Temple
Hong Kong Mathew Browne
How to add a new spot to PhotoHound
Step 1 – Add a title and location
Spot Title
Keep titles short, clear and relevant to the subject of the photo.
- Use simple titles: e.g. The Trevi Fountain
- If it’s a building, specify if it’s the interior or exterior: e.g. Natural History Museum – Interior
- Use explanatory names: e.g. View of St Paul’s from Millennium Bridge
- Use the local name first (add the English translation in brackets if applicable): e.g. Rabeljsko Jezero (Predil Lake)
Interiors and exteriors of buildings
When submitting spots of public buildings and tourist attractions (museums, churches, cathedrals, etc), the interiors and exteriors should be listed as separate spots. This is because the shooting recommendations will be different. For example – an interior of a cathedral might have certain opening hours, an entry fee, and tripods may not be welcomed. Whereas the exterior of the same cathedral may be freely accessible at all hours, with tripods allowed.
Spot Markers
- Place a marker for your spot on the map. The marker should represent the place where you took the photo, not the subject of your image.
- The text search box helps you quickly zoom to the nearest street, town or city. For example, search for “Baker Street London” to locate address on the map. After that, simply click and drag the red marker to the exact location.
- If it’s helpful, click one of the additional marker buttons to add extra markers. These can be used to describe other helpful points to find the spot, such as the nearest car park, public transport, ticket booth, or entrance.
Check for duplicates
When you place a marker on the map, you will be alerted to nearby spots, if any exist. If your spot has already been added, just click on that spot’s thumbnail to visit the existing spot, and add your photo to the existing spot.
If you believe you have more than one iconic or key shot, and feel they merit being classed as individual spots despite their proximity, then you can continue to create a new spot, even if the majority of the description is copied.
Step 2 – Add Your Image(s)
Your photos illustrate what is possible from this photo spot, and are essential to provide information, reference and inspiration. EXIF data is extracted to help people know exactly how to achieve shots like yours.
Our recommendations for images are as follows:
- The more, the merrier! Add as many photos as you like, particularly if these depict the same spot throughout the seasons, different compositions, angles or settings.
- Recommended image size: 1600px long side.
- Use “Save as” with jpeg setting 10 for compression (not “save for web” in Photoshop as this strips off EXIF info)
- Please do not use photos that aren’t possible for regular visitors to take. For example, shots from restricted areas, or where the view is no longer the same – e.g if there is new construction or that famous tree collapsed…
- Your cover image should be a photo which gives a sense of place, rather than abstract details and subjects that could be found anywhere. e.g. a leaf on the ground, a lone flower. For example, a city park should have a wide angle view of the park as the cover image, but you can submit additional photos of the park’s flora and fauna.
- Please avoid images that show remarkable conditions that are unlikely to be found again at this spot, and therefore would not be of interest under normal circumstances, e.g. a concert in a park, where the stage is unlikely to be in place the rest of the year.
Step 3 – Add more information
When To Visit
Select “All year round” if the spot is accessible during all months, or select the months you can get to this spot (for example is it inaccessible during winter months as the pass is closed, is it out of bounds during nesting seasons etc). Add any supporting notes about this in Tips and Advice.
Photo Styles
Here you can select all types of photography that can be shot at this location e.g. landscape, cityscape, architecture. Tick all that apply.
Recommended Gear
What gear would you recommend for this specific location? This can be broader than the gear that you used to shoot at that particular time. For example, you may not use ND filters but if you think it would help others achieve their best shot, mark this as recommended.
Is There An Entrance Fee?
Select this if it an entrance fee is payable or when any costs are involved to access this spot. For example, if guided walks, boat trips, chairlift tickets are required etc. You can describe more about it in the Tips & Advice section. If not certain, leave unmarked.
Are Tripods Allowed?
Only select this if you know for certain that tripods are allowed.
Are Drones Allowed?
Only select this if you know for certain that drones are allowed. Many countries have strict drone laws. If in any doubt, leave this unchecked.
Wheelchair Accessible
Whilst Physical Level 1 suggests easy access, consider here whether there are additional elements that might make wheelchair access difficult (e.g. steps up to the final viewpoint, with no ramp available). If you are not certain, leave unmarked.
Physical Difficulty
Choose from the following:
- Accessible to all Requires minimal walking. The pathway is wide and even. Elevation gain is minimal.
- Easy Requires modest level of physical fitness. Pathway mostly even. May include moderate elevation gain / loss.
- Moderate Requires average level of physical fitness. Pathway may be uneven in places (cobbles, embedded rocks, tree roots), but is safe and wide. May include moderate to steep elevation gain/loss.
- Rugged Requires an above average level of physical fitness and confident walking. Pathway may be very uneven in places (overhanging foliage, jutting rocks, exposed tree roots) and requires experienced hiking to reach the location. Sturdy footwear advised. May include steep elevation gain/loss.
- Demanding Requires a high level of physical fitness and experience of challenging hikes. Pathway may be uneven, narrow and may be dangerous in places. Sturdy footwear advised. May include steep elevation gain/loss. Not advisable to attempt unaccompanied.
All done!
Hit the Add spot button to add your photo spot to PhotoHound. Our team of curators will review your spot within 24 hours, and you will receive a notification when it has gone live.
We look forward to enjoying your wonderful photos and thank you for sharing your photo experience with the PhotoHound community,